Tuesday, November 29, 2016

How to use Tasker | Part IV [Scenes]

Tasker is one of the most powerful which is used for task control and task automation app. In the previous post we learned about Shortcuts and Widgets & Associating tasks with context. In this post we will learn about:
  • Scenes
  • Displaying a scene
  • Using variables

Scenes

Scene creation is actually an advanced topic that deserves its own separate tutorial, but I'll briefly talk about it here for the sake of completeness.


A scene is a custom UI that you build from scratch. It can utilize elements that you most often find on UIs, including such elements as buttons, doodles, pictures, maps, menus, shapes (e.g., ovals, rectangles), sliders, text boxes, text input fields, and web viewer boxes. Every element is customizable. For demonstration purposes, I'll show you how to create a simple popup box that displays an SMS message when it arrives.
  1. Open the Scenes tab in Tasker.
  2. Add/Create a new scene. Provide a name for it. In this example, I'll use "PopSMS" as scene names
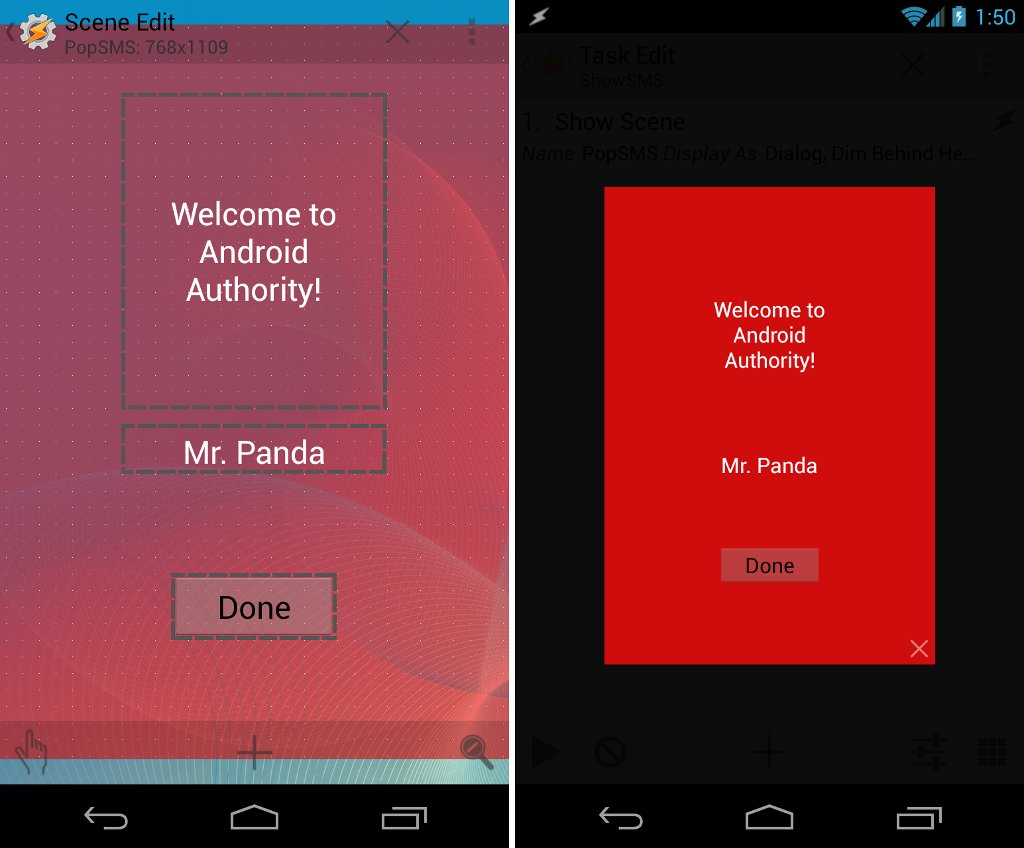
  3. You'll see the Scene Edit screen in Preview Mode, with a dotted box in the middle. The dotted box is your scene display area. You can resize this, if you want. You can also change the background color of the display area, if you want. For now, let's just stick to the default.
  4. To be able to add UI elements to the display area, you need to switch to Editing Mode by tapping the magnifier with an X at the lower-right corner. Then, hold down on the display area to bring up the UI elements menu.
  5. Tap on Text to add a text box to the display area. Keep its default name. In this text box we'll display the text body. So, as value for Text, we specify a variable, specifically the variable in the body of an SMS message. Tap the tag icon at the right of the Text label, scroll down, and tap "Text Body." You should find %SMSRB as the value for Text.
  6. Tap the virtual Back button to return to the Scene Edit screen.
  7. We'd like to show the name of the sender, too. So, let's add another text box to display the sender's name. Just follow the same procedure for adding a text box to display the SMS text body, but for Text value, choose "Text From Name." You should see the variable %SMSRN as the value for Text.
  8. Again, tap the virtual Back button to return to the Scene Edit screen.
  9. Finally, we'd like to add a button to close the popup box after the message is read:
  • Select "Button" from the list of UI elements. Just keep the button's default name.
  • For Label, you can use "OK," "Done," or "Close."
  • Then, specify the action to perform when this button is tapped. For that, switch to the Tap tab. Then, tap Add > Scene > Destroy Scene. This action, of course, does what it says -- it will destroy the scene that you specify in the Name field. Choose "PopSMS" as the scene to destroy. It should appear in the Name field.
     10. Tap the virtual Back button until you're back at the main Tasker screen. You should be able to find PopSMS on the Scenes tab.
                 

Displaying a scene

So far, I've only shown you the scene creation part. That scene will be useless unless it is displayed or showed. In this way, we have to make a task of showing the said scene. At that point, the task needs to be linked to a context; for this situation, the context will be an event, specifically, the event where the phone receives a text message.
  1. Open the Tasks tab. Create a new task by tapping the Add button (plus sign) at the lower-right corner. Name the task anything you want. In this example, I name it "ShowText." Tap the checkmark to save the name.
  2. On the Task Edit screen, tap the Add Action button (plus sign). Then, tap Scene > Show Scene.
  3. On the Action Edit screen, tap the magnifier icon at the right side of Name and select "PopSMS," which is the name of the scene that we created earlier.
  4. From the drop-down list under Display As, select " Dialog, Dim Behind Heavy." This will cause the scene to be shown as a dialog box, with everything behind it dimmed heavily.
  5. Tap the virtual Back button until you reach Tasker's main screen. You should be able to see "ShowText" listed on the Tasks tab. The task now needs to be linked to a context in order to execute it.
  6. Open the Profiles tab. Create a new profile and context by tapping the plus button at the lower-right of the screen. Select Event > Phone > Received Text. Just leave the default event settings as they are for now.
  7. Tap the virtual Back button to return to the main screen. You'll be shown a popup list of tasks to link to the new context and profile. Select "ShowText" from the list.
  8. Make sure that the newly created profile is enabled so that Tasker can execute the associated task when triggered.
The example above, of course, is a very rough one. But, if you have the time and the patience, you can refine it further. Tasker lets you tweak a lot of the details.

Using variables

define it simply, a variable is a name for a value that changes over time. Much the same as scene creation, Tasker variables are likewise unpredictable themes that merit their own different separate tutorials. I'll talk briefly about them, though, just to let you know what immense power you'll get if you just patiently climb the steep hill of learning how to use Tasker.
                 

In the past area about scene creation, you experienced two variables spoke to by %SMSRB and %SMSRN

If you've ever done some programming before, you'll be familiar with the concept of variables. They're close kin to variables that you keep hearing about in algebra class. To (for SMS Text Body and SMS Sender Name, respectively). These are examples of built-in variables that you can use in Tasker. You cannot set, create, or define these kinds of variables. (That's why they're called "built-in.") Tasker variables always begin with the percent (%) symbol. Variables in all uppercase are built-in variables. They are usually derived from system information, device status, or events. Some common examples are

%TIME - (current time),
%DATE - (current date),
%BATT - (current battery level), and
%WIFI
(whether Wi-Fi is enabled or not). Aside from built-in variables, there are two other variable types: local and global. Both are user-defined and user-created. The main difference between them is that local variables can be used only within the task or scene in which they are created, defined, or used; global variables are accessible to all of Tasker. Another main difference is in capitalization: local variables use all lowercase but global variables have at least one uppercase letter in its name. You're nearly done with this general tutorial about Tasker. If you want to learn more about how to use Tasker, or review in a visual way what I've discussed so far, you can watch our video tutorial in the next section.

Some things to keep in mind

Google has made some significant changes to Android, pushing some Tasker features out the door. These are not very common tasks and actions, though. I have been using the same Tasker projects for years and none have failed me yet. Have any of yours let you down?

Conclusion

Tasker is a capable, complex, and customizable robotization and programming application, yet it can scare to a few and may not be for the weak of heart. It additionally has a lofty expectation to absorb information - I myself can validate it - yet it's justified regardless of the inconvenience. It takes some an opportunity to get comfortable with, a great deal more to be capable with, however the time will be justified, despite all the trouble. It's a little cost to pay for the force, adaptability, and control that Tasker permits you to employ over your Android gadget. Do you utilize Tasker? What do you utilize it for? On the other hand, would you say you are new to Tasker? How's your involvement with it as such? Impart your Tasker encounters to us. Sound off in the remarks.

How to use Tasker | Part III [Shortcuts & Widgets]

Tasker is one of the most powerful which is used for task control and task automation app. In the previous post we learned about what is Actions and Tasks, Importing/Exporting Tasks, Delete a task or action, Rearranging actions in a task & Running a task manually. In this post we will learn about:
  • Shortcuts and Widgets
  • Associating tasks with context

What about Shortcuts and Widgets?

Tasks can also be manually run through shortcuts or widgets. Simply put a Tasker Task widget, or Tasker Task shortcut, or even a Task Timer widget (which has a countdown timer) on your homescreen. At that point, select the task to associate with it.

Once the widget or shortcut is set up, you can run its related task by tapping on the icon simply like you'd regularly do with any application. Since you know how to set up tasks, you can create them execute automatically by associating them with triggers (referred to in Tasker as "contexts").

Associating tasks with context

Activities that are assembled in tasks won't do much unless they are actually run - either automatically or manually. As I've specified in the previous segment, you can run Tasks manually. Despite the fact that it's as of now helpful to manually execute a few activities at the same time, it's more advantageous to run them in some sort of programmed way. Here's the place Tasker really shines - it can automate task execution as indicated by rules, conditions, or triggers (otherwise called "contexts" in Tasker). You can consider Tasker contexts as conditions or circumstances, which, when genuine, will teach the application to run the related task(s). You can likewise consider contexts the "if" part of a conditional statement, while the tasks are the "then" part.

Tasker provides numerous contexts, grouped into 6 categories:
  1. Application - Triggers task execution when an application is launched or run.
  2. Day - Runs tasks relying upon day(s) that you determine.
  3. Event - Tasks run when certain "events" happen on your device. This classification has the following subcategories: Date/Time, Display, File, Hardware, Phone, Power, Sensor, System, Tasker, UI, Variables, 3rd Party.
  4. Location - Runs tasks when the device enters a user-defined geological location.
  5. State - Runs tasks when the device enters a specific state or condition (e.g., Bluetooth status is off, Wi-Fi is connected, and so on.). This classification has the following subcategories: App, Display, Hardware, Net, Phone, Plugin, Power, Sensor, Tasker, Variables.
  6. Time - Runs tasks according to the time of day that you specify. A beginning and ending time an be specified. Task execution can also be repeated every n minutes or hours after first execution.
Let's go back to our "Battery Save" task. You can set this task to keep running, for case, each time your Battery level goes beneath half. Here's the way you may set all that up:Open the Profiles tab in Tasker.
  1. Open the Profiles tab in Tasker.
  2. Tap the Add New Profile button (plus icon) at the bottom right of the screen.
  3. Select State > Power > Battery Level. This will be the connection or trigger under this profile.
  4. On the edit page, drag the To slider to "50". Keep the From slider at "0". This setting signifies "When the Battery level is somewhere around 0 and 50."
  5. Tap the Back button to return to the previous screen. From the popup list that shows up, tap on "Battery Save" to choose it and associate it with the context.
  6. You'll now see the new profile on the Profiles tab. To its right is an On/Off switch. If the switch is on, Tasker will perform the associated tasks when the trigger is activated or when the context or conditions are met.
  7. To change the default profile name, long-tap on the profile name and tap the Name button (represented by the uppercase letter A) at the top of the screen. Type the name of the content field, and tap the checkmark button to save it.
  8. Beneath the new profile's name, you'll see the context name and a green arrow pointing towards the task connected with it. You can likewise rename the setting name, if you want. Simply log-tap on the setting name, select Name, type the name on the content field, and save it by tapping the checkmark button.
Now, every time your device reaches 50 percent of its Battery power or lower, Tasker will execute the activities listed in the Battery Save task that you defined. In the next section, I'll speak a bit about creating scenes in Tasker. These are custom UIs that can help you plan your own mini apps using Tasker. I'll also discuss variables very briefly.

In the next post, we will learn about:
  • Scenes
  • Displaying a scene
  • Using variables

How to use Tasker | Part II [Action & Tasks]

Tasker is one of the most powerful which is used for task control and task automation app. In the previous post we learned about what is Tasker and Tasker’s UI and in this post we will learn about:

  • Actions and Tasks
  • Named and Unnamed tasks
  • Importing/Exporting Tasks
  • Delete a task or action
  • Rearranging actions in a task
  • Running a task manually

Actions and Tasks

Tasks - on the off chance that you haven't saw in the application's name - are the absolute entirety of Tasker. In any case, a Tasker task is nothing without activities, which are stuff that your phone or tablet does. Tasks and activities are connected. An "task" in Tasker is an collection of activities performed in a steady progression when the said task is invoked. When you knot a few activities into one task, those activities become meaningful and relevant to you as a user because the independent actions appear to serve a shared objective (i.e., the task). It might be simpler to think about an task as an objective or a final product that can be accomplished by one or a few activities.

It might likewise think about an task as a sequenced rundown of things to do. For example, you might need to set up an task for sending update messages at specific hours of the day. The task for this might include actions for connecting to Wi-Fi or enabling mobile data, creating an email message, sending an email message, and afterward disconnecting from the network.

Named and Unnamed tasks

When you create an task, you usually provide a name for it. For example, I can create an task for saving battery power. The task may comprise of activities to kill Wi-Fi, GPS, mobile data, Bluetooth, and NFC. At that point, I can likewise create another task for use when I'm outside - and apropos name it "Outside"; the set may comprise of activities like enabling auto brightness, enabling vibration feedback, and setting the ring volume to max. Naming an task creates the task reusable; you can call up the same task in a wide range of profiles and settings. Now and again, however, you don't have to give a name to an task, particularly for one-activity tasks made when you create a profile, alternate way, widget.

Here's an example

To illustrate the idea of Tasks and activities more clearly, how about we attempt really making an task. This example task, which we'll name "Battery Save", will do the following:

  • Disable auto brightness and auto sync.
  • Set brightness level to low.
  • Set display timeout to a low value.
  • Disable Wi-Fi, mobile data, haptic feedback, GPS, and Bluetooth.

Here's how to set up all those actions in one "Battery Save" task:
  1. Create a new task, as follows:
  • Open the Tasks tab.
  • Tap the Add New Task button at the lower-right corner of the screen.
  • Type a name for the new task. In this case, use "Battery Save."
  • Tap the checkmark button to save the new task. You'll see the Task Edit screen.
      2. Disable auto brightness, as follows:
  • On the Task Edit screen, tap the Add New Action button (plus icon) at bottom of screen.
  • Tap on Display > Auto Brightness. Change the value of Set to "Off". Tap the Back button to return to previous screen.
      3. Set brightness level to a low value (e.g., 25, or even 0), as follows:
  • On the Task Edit screen, tap the Add New Action button (plus icon) at bottom of screen.
  • Tap on Display > Display Brightness. Change the value of Level to "0". Tap the Back button to return to previous screen.
      4. Set display timeout to a low value (15 seconds, maybe), as follows:
  • On the Task Edit screen, tap the Add New Action button (plus icon) at bottom of screen.
  • Tap on Display > Display Timeout. Change the value of Secs to "15". Tap the Back button to return to previous screen.
      5. Turn off or disable various battery-eating services, as follows:
  • On the Task Edit screen, tap the Add New Action button (plus icon) at bottom of screen.
  • Change the value of Set to "Off" in the locations listed below. Remember to tap the Back button to save the action and return to the action list.
                           i. Net > WiFi
                          ii. Net > Mobile Data
                         iii. Audio > Haptic Feedback
                         iv. Misc > GPS
                          v. Net > Bluetooth
                         vi. Net > Auto-Sync

You now have an task named "Battery Save". You can run the task manually in the event that you need. Then again, even better, you can interface it to a setting/trigger (more about this later). You can even share this task to other individuals as an APK file that can be introduced on other Android devices. Simply trade the task as APK file.

Importing/Exporting Tasks

To import a saved task into Tasker, simply tap the Tasks tab. At that point, select Import from the menu, browse for the XML file, and tap to import it.

To export a task, long-tap on the task name. Tap the Menu button, then select Export. You can export a task as an APK file or as a XML file.

How to delete a task or action

To delete a task, long-tap on a task name on the tasks list, then tap the Trash icon. To delete an activity, open the task containing the activity, tap-hold on the activity's icon at the right side of the activity name, then drag-drop the activity name on the Trash icon at the bottom of the screen.

Rearranging actions in a task

To move an activity up or down a rundown of activities, simply tap-hold on the activity's icon at the furthest right side of the activity name, and drag-drop the activity name to its new area.

Running a task manually

Open the Tasks tab. Tap on the task to be run; the Task Edit screen opens. Tap the Play button at the bottom of the screen.

In the next post, we will learn about:
  • Shortcuts and Widgets
  • Associating tasks with context